-
Compressed Dynamic Range
There is an in-depth Photoshop tutorial in this article, so make sure to read the whole thing!
There has been a good deal of activity and interest lately in the area of “high dynamic range” or HDR imagery. Many of these “HDR” images are characterized in part by a surreal or otherworldly feeling accompanied by an ethereal glow surrounding the subject. I think the term “HDR” was ill-conceived in this context. There is such a thing as a high dynamic range image, but you wouldn’t be able to view it because it contains more tonal data than you can perceive or that a computer monitor could display. A true HDR image would be processed into viewable images by compressing its range; essentially by running it through Photoshop’s “levels” or “curves” (but not in Photoshop, because Photoshop probably couldn’t open it).
The HDR images you see on Flickr and PhotoSIG are actually compressed dynamic range because they portray scenes that had too much tonal range to be captured in a single frame; the range of tones from highlight to shadow are compressed into the range of a normal image. This is usually achieved by making two or more frames at different exposure settings and combining them using Photoshop or one of a number of standalone and plug-in softwares for that purpose (such as Photomatix, PanoTools, etc.)
It’s easier to understand (for me, at least) using pictures, so here is an example. The two photographs below were taken of the same scene, a scene with too much range for my camera to see full highlight and shadow detail at the same time. One of the photos is exposed to capture the highlight data completely and the other is exposed to capture the shadow data completely.
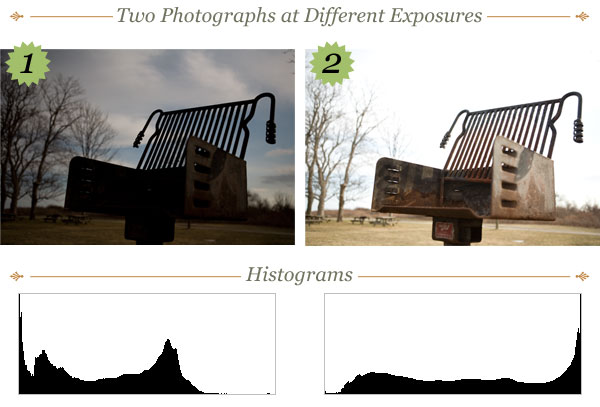
Below the photos you can see their histograms (I just snagged these from Photoshop’s histogram palette). Notice how photo #1’s histogram is biased toward shadow data and photo #2’s is biased toward highlight data. You can see from the pictures themselves that #1 has a much cooler looking sky, while #2 has the detail you would probably want in the subject (in this case, a humble charcoal grill).
-
Hark, the Ness
It was a very seasonable Spring day this afternoon with highs (finally) in the upper 50s, low 60s. I spent some time down at Harkness Memorial State Park getting back into the swing of things with my particular brand of abstraction.
These photos were all processed with my brand new copy of Adobe Lightroom 1.0, which I purchased after participating in the public beta since it was released and I admit it, I’m hooked! The one photo here worth saying more about is the first one, an oddly glowing charcoal grill. I attempted a technique that has been generating a lot of buzz lately; so-called HDR or High Dynamic Range. I prefer to call it Compressed Dynamic Range because I think it’s more accurate, but I’ll do a whole post about that later on.
-
The Martin Center
I was at the Martin Center in New London photographing a winter guard practice that my friend coaches, purely as a favor, and couldn’t help but to grab a few other interesting things I saw along the way. I hope you enjoy them!

-
Digital as a New Medium
In 1932, Ansel Adams and Edward Weston, among others, formed “Group f/64” with the intent to “define photography as an art form by simple and direct presentation through purely photographic methods.” (Wikipedia, Group f/64) As stated in their manifesto,
Pure photography is defined as possessing no qualities of technique, composition or idea, derivative of any other art form. The production of the “Pictorialist,” on the other hand, indicates a devotion to principles of art which are directly related to painting and the graphic arts.
-
Traveling Photogs
I’m preparing to depart for Death Valley National Park in California for three days of shooting; my first serious photography trip ever, actually. If I can, I’d like to offer a few words of advice for anyone considering taking a serious photography trip, and possibly even for those who do.
- Make a list. This is very important. Make a list of everything you will need on your trip, from cameras and batteries to accessories and your toothbrush. It may seem unnecessary if you don’t have a lot of things to bring, but trust me on this: even the pros make lists. Don’t get caught without an important bit of equipment! If you do, however, add it to the list so you won’t forget it next time!
- There is no such thing as too much gear. I hear some of you out there saying, “Why would I want to bring this old lens with me,” or “I’m not going to need a super-telephoto to shoot vast canyons or mountain ranges.” Never underestimate what you will find a use for. Even your old lenses can become serviceable stand-ins for your cutting-edge ones in a pinch.
- You can’t actually have too many batteries. Similar to the previous advice, never get caught without a power source. I’m taking seven Canon batteries with me, my friend is taking eight; we both would bring more if we had them (and if they weren’t $50 each!)
- If you’re planning to do night photography, it will be very helpful to have a flashlight with a red lens cover, or a red LED flashlight, or something similar. Once you’ve become acclimated to the dark, you don’t want to lose it when you swap out lenses (unless you can swap out lenses by touch…)
- Scout out the location beforehand. There are tons of online resources about Death Valley regarding the availability of different roads, what’s going on with the three gas stations within the park, numerous maps and guides, the advice of other photographers, and so on. Wherever it is you’re going, make sure you’re well informed!
- It will help to have an itinerary. On any trip, you will not have unlimited time, so the most effective way to make use of it is to plan every shooting location and time and figure out how long it will take to get from place to place so that not a moment is put to waste. You will probably want to plan your shooting locations around sunrise and sunset times, as well. Refer to sites such as The Old Farmer’s Almanac to find times for any city.
- Last but not least, have fun. Even if you’re on assignment, or building a stock portfolio, never lose sight of the enjoyment of being in a cool place with your camera around your neck. A sense of whimsy can inform your artistic vision; never forget that!
That’s all I have for now. After my return, I will share with you what went right and what went wrong and hopefully offer more useful advice. Keep shooting!